Mexidinho à Mineira

If you are reading this blog in English, it’s likely that you never tried “comida mineira” or food from Minas Gerais, a state in Brazil. In Brazil, each state has its own culinary style, and in my opinion, Minas Gerais is on top of it. If you want to have an idea, go to google and type “comida mineira” and take a look at the images. They speak for themselves… dishes with bacon, sausages, pork, beans, and of course “farofa”. Farofa is a toasted manioc flour mixture that can be found in some delicatessen in the UK. I always bring mine from Brazil every time I go back 🙂

This recipe is a one pot rice dish, perfectly for weeknight dinners, which combines wonderful flavours. My mom and I saw this recipe on tv once, and we had to make it on that same evening. After that, I lost count how many times we had it. There is only one problem… it’s impossible to stop eating! Give it a try and tell me if you can.

Mexidinho à Mineira

Ingredients

  • 80g bacon, cubed
  • 200g smoked sausage, cubed
  • 1 onion, chopped
  • 1 clove garlic
  • 1 large tomato, cubed (seeds removed)
  • 2 eggs
  • 200g collard greens (known as fresh greens in UK), stalk removed and finely sliced
  • 2 cups cooked black-eyed peas
  • 4 cups cooked long grain rice
  • chopped parsley
  • 1 chili finely chopped (seeds removed)
  • 1 bay leaf
  • salt to taste
  • 50g farofa (toasted manioc flour mixture)
  • 100g halloumi

Preparation

  1. Heat a large saucepan and fry the bacon (it’s not necessary to add oil). Transfer to a plate with kitchen paper and reserve. On the fat remaining in the frying pan, fry the sausage. When the sausage is cooked, add the onion, garlic, chili (if using), tomatoes and sauté for a couple of minutes.
  2. In another frying pan (preferably non stick), make scrambled eggs and reserve. On this frying pan, add the collard greens just to wilt it but still keeping the vibrant green colour. Season with salt and reserve. Slice the halloumi into tick slices and grill it until they have a nice golden crust. Cube the halloumi and reserve.
  3. In the saucepan with the bacon and sausage mixture, add the beans, rice, parsley, scrambled eggs, greens, and the bay leave. Season if necessary (but be careful as the bacon and sausage are already salty). Mix well carefully so you don’t break the rice grains or smash the beans.
  4. Add the farofa slowly, the cheese cubes and mix everything together. Remove the bay leave and serve.

Yield: 4 a 6 servings.

Condensed Milk Flan

On the list of classical Brazilian puddings, this condensed milk flan is certainly on top of it. In fact, you might know that we Brazilians love to use condensed milk in our desserts =)

I made this flan in individuals moulds, but you can make a big one, using one of those cake tins with a tube in the middle (not the ones with removable bottom).

Condensed Milk Flan

Original recipe from Nestlé

Ingredients

Caramel

  • 1 cup granulated sugar
  • 1/2 cup hot water

Flan

  • 1 tin (397g) condensed milk
  • 2 tins whole milk (use the condensed milk tin as measurement)
  • 3 eggs

Preparation

Caramel: In a medium saucepan, melt the sugar until it is all dissolved with a nice caramel color. Try not to stir at this point, simply tilt the pan to melt everything evenly. Add the hot water and let it boil, stirring with a wooden spoon, until all the sugar has dissolved again and the caramel has thickened. Pour the caramel into a 19cm cake tube tin or 8 pudding moulds. Tilt the tin so the caramel covers all the bottom and sides, but be careful because it’s extremely hot. Reserve.

Flan: Pre-heat the oven to 180°C. Blend all the ingredients in a blender and pour into the prepared tin (or individual moulds). Put the tin in large and deep baking pan and fill with boiling water up to 1/3 of the height of the tin (or 1/2 of the moulds) creating a bain-marie. Cover with foil and take it to the pre-heated oven for about 90 minutes (if using individual moulds, check after 75 minutes). The flan is baked when a knife comes out of it clean. Remove from the oven and the bain-marie and let it cool at room temperature. Refrigerate for a minimum of 6 hours before serving. Unmould the flan on a large plate. Make sure you get all the caramel sauce remaining in the tin. Enjoy!

Yield: 8-10 servings

Foolproof Chocolate Fondant

This was the first time I made chocolate fondants from scratch and I can see myself making this recipe over and over again. It will certainly impress your guests and you can enjoy their faces as they cut into the small cake and see the melting chocolate sauce running on the plate… yummy! The combination of hot chocolate cake and sauce with ice cold vanilla ice cream is fantastic.

You can prepare the fondants ahead of time and keep them in the fridge or freezer, but you can only bake it right before you serve. The only secret here is timing. If you leave too long in the oven, it will cook through and you will end up with a solid chocolate cake. If you bake for just a little, the cake won’t hold its shape and it will collapse when you try to unmold it. The recipe suggests exactly 12 minutes, but due to the variation in the ovens it could be a little more or less. Basically you will see the cake cooked on the outside but still with a wobble to it.

Foolproof Chocolate Fondants

From Good Food Magazine November 2011

Ingredients

  • 175g butter, plus extra melted for greasing
  • cocoa powder for dusting
  • 175g good quality dark chocolate (70%)
  • 200g golden caster sugar
  • 4 eggs
  • 85g plain flour
  • vanilla ice cream and fresh raspberries, to serve

Preparation

  1. Heat oven to 200C/180C fan. Use a pastry brush to great 6 pudding moulds really well and place in the fridge for the butter to set. Then grease again, dust with cocoa powder and set aside.
  2. Melt the butter and chocolate together over a pan of barely simmering water, then remove. In a separate bowl, beat the sugar and eggs together until light and fluffy. Fold the chocolate and beaten egg together, then fold through the flour.
  3. Divide the mixture between the moulds. The pudding can now be frozen or chilled.
  4. Place on a baking tray and bake for exactly 12 minutes until the mixture has puffed up and formed a crust but still has a slight wobble to it. Turn the puddings out onto serving plates and serve with a big scoop of vanilla ice cream for a great contrast of hot and cold.

Yield: 6 fondants

Optional: Add different flavours to you chocolate fondant, like finally chopped chillies or coffee (add 50ml good quality expresso coffee right before folding the flour).

Chili con Carne

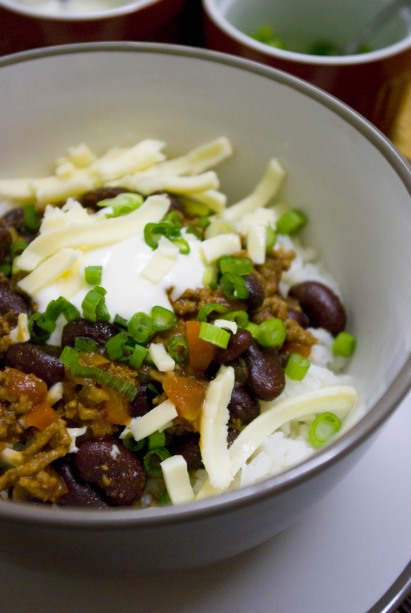
Who wouldn’t like a bowl of chili in a winter night? If you haven’t tried making this TexMex dish at home, here is a quick and easy recipe that you can make on a weeknight. This version is mild, because I don’t like my food too spicy… so adjust the amount of chili powder to your taste. I like to eat my chili with rice, sour cream, cheese and spring onions. But feel free to eat with tortilla chips, if you prefer. You can also use the leftovers (if there is any) to top a pile of tortilla chips (or Doritos), add cheese and then you have delicious nachos =)

Chili con Carne

Adapted from the Good Food Magazine, May 2002

Ingredients

  • 1 tbsp oil
  • 1 large onion, chopped
  • 1 red pepper, chopped
  • 1 red chilli, deseeded and finely chopped
  • 2 garlic cloves, peeled and finely chopped
  • 1 heaped tsp hot chili powder (or 1 level tbsp if you only have mild)
  • 1 tsp paprika
  • 2 tsp ground cumin
  • 500g lean minced beef
  • 1 beef stock cube
  • 400g can chopped tomatoes
  • ½ tsp dried marjoram
  • 1 tsp sugar
  • 2 tbsp tomato purée
  • 2 cans (420g each) red kidney beans
  • salt and pepper to taste (I use about 2 tsp of salt)
  • soured cream, boiled long grain rice, grated cheese and spring onions, to serve

Preparation

  1. In a pan on the hob over a medium heat, add the oil and heat for 1-2 minutes until hot. Add the onions and cook, stirring fairly frequently, for about 5 minutes, or until the onions are soft, squidgy and slightly translucent. Tip in the garlic, red pepper, chili, paprika and cumin. Give it a good stir, then leave it to cook for another 5 minutes, stirring occasionally.
  2. Turn the heat up a bit, add the meat to the pan and stir constantly. Make sure you keep the heat hot enough for the meat to fry and become brown, rather than just stew.
  3. For the sauce, crumble your stock cube into 300ml of hot water. Pour this into the pan with the mince mixture. Add the chopped tomatoes and  tip in the marjoram and the sugar. Season with salt and pepper. Squirt in about 2 tbsp of tomato purée and stir the sauce well.
  4. Bring the whole thing to the boil, give it a good stir and put a lid on the pan. Turn down the heat until it is gently bubbling and leave it for 20 minutes. Check on the pan occasionally to make sure the sauce doesn’t catch on the bottom of the pan. After simmering gently, the saucy mince mixture should look thick, moist and juicy.
  5. Drain and rinse the beans in a sieve and stir them into the chilli pot. Bring to the boil again, put the lid on again and gently bubble for another 10 minutes, adding a little more water if it looks too dry. Taste a bit of the chili and adjust the seasoning, if necessary. Now replace the lid, turn off the heat and leave your chili to stand for 10 minutes before serving. Leave the chili to stand is important so the meat incorporate all the flavours of the spices.
  6. Serve with long grain rice, sour cream, grated cheese and spring onions or simply with tortilla chips.

Yield: 4 servings

Nutritional Information (per serving): 387 kcalories, protein 36g, carbohydrate 25g, fat 17 g, saturated fat 6g, fibre 6g, sugar 1g, salt 2.32 g

Note: This actually yields 6 servings, but I kept above as in the original recipe because of the nutritional information.

Pear and Almond Tart

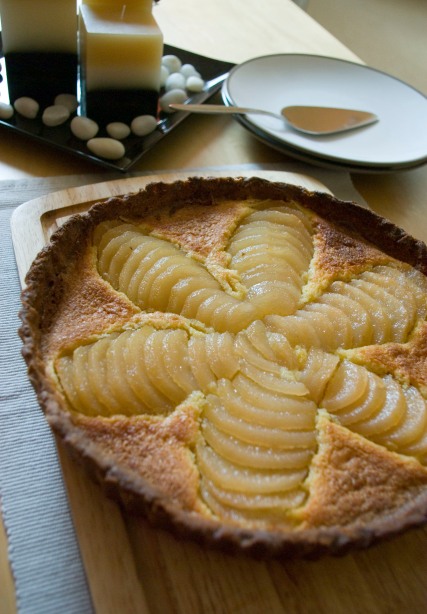
I was just waiting for the pear production from our tree to begin to make this pie. The combination of pears with this almond cream is simply delicious.

The only thing I changed is that the suggested time in the oven, which was too much in my opinion. The crust was too dark for my taste, and I tried to keep an eye on it. It could also be something with my oven, which is not the most precise. So I put the time I think it should be and you pay attention to your tart. Nevertheless, until I make this tart again, let’s stay with these pictures  =)

Almond and Pear Tart

Adapted from Bon Appétit Magazine

Ingredients

Pears

  • 4 cups water
  • 1 1/4 cups sugar
  • 1 1/2 tablespoons fresh lemon juice
  • 3 medium-size firm but ripe Bosc pears, peeled (each about 7 ounces)

Crust

  • 1/2 cup powdered sugar
  • 1/4 cup blanched slivered almonds
  • 1/4 teaspoon salt
  • 9 tablespoons (1 stick plus 1 tablespoon) unsalted butter, room temperature
  • 1 large egg yolk
  • 1 1/4 cups all purpose flour

Almond Filling

  • 2/3 cup blanched slivered almonds
  • 1 tablespoon all purpose flour
  • 7 tablespoons sugar
  • 6 tablespoons (3/4 stick) unsalted butter, room temperature
  • 1 large egg
  • Powdered sugar (optional)

For pears:
Bring 4 cups water, sugar, and lemon juice to boil in large saucepan over medium-high heat, stirring until sugar dissolves. Add pears. Reduce heat to medium and simmer until pears are very tender, turning occasionally, about 20 minutes. Cool pears in syrup. (Can be made 2 days ahead. Cover and refrigerate.)

For crust:
Blend powdered sugar, almonds, and salt in processor until nuts are finely ground. Add butter and blend until smooth, scraping down sides of bowl occasionally. Mix in egg yolk. Add flour. Using on/off turns, blend until dough comes together in clumps. Gather dough into ball; flatten into disk. Wrap in plastic and chill at least 3 hours. (Can be made 2 days ahead. Keep refrigerated.)

For almond filling:
Finely grind almonds and flour in processor. Mix in 7 tablespoons sugar, then butter, blending until smooth. Mix in egg. Transfer filling to medium bowl. Cover and chill at least 3 hours. (Can be made 2 days ahead. Keep chilled.)

Position rack in center of oven and preheat to 190°C/375°F. Roll out chilled dough on floured sheet of parchment paper to 30cm round, lifting and turning dough occasionally to free from paper. Using paper as aid, turn dough into 23cm diameter tart pan with removable bottom; peel off paper. Seal any cracks in dough. Trim overhang to 1/2 inch. Fold overhang in, making double-thick sides. Pierce crust all over with fork. Freeze crust 10 minutes.

Line crust with buttered foil, buttered side down, then fill with dried beans or pie weights. Bake crust until sides are set, about 20 minutes. Remove foil and beans. Bake crust until sides are golden and bottom is set, pressing with back of fork if crust bubbles, about 10 minutes longer. Cool crust in pan on rack. Reduce oven temperature to 175°C/350°F.

Spread almond filling evenly in crust. Stem pears and cut each in half lengthwise; scoop out cores. Cut each half crosswise into thin slices. Gently press each pear half to fan slices but keep slices tightly overlapped. Slide spatula under pears and arrange atop filling like spokes of wheel with narrow ends in center.

Bake tart until golden and tester inserted into center of filling comes out clean, about 55 minutes. Cool tart in pan on rack. Push pan bottom up, releasing tart from pan. (Can be made 8 hours ahead. Let stand at room temperature.) Cut tart into wedges; sprinkle with powdered sugar, if desired, and serve.

Yield: 8 servings

Fudgy Coconut Brownies

Do you like chocolate and coconut? Then you’ve got to try these brownies. I got this recipe in the Good Food Magazine and another good thing about it is that it is very easy to make. I bet you have all the ingredients at home. Try it!

Fugdy Coconut Brownies

Ingredients

  • 100g cocoa powder
  • 250g butter
  • 500g golden caster sugar
  • 4 eggs, beaten
  • 100g self-raising flour
  • 100g desiccated coconut

Preparation

  1. Heat oven to 180C/160C fan. Line the base of a 21cm square tin with baking parchment.
  2. Put the cocoa, butter and sugar in a saucepan and gently melt, stirring so the mixture doesn’t catch. When the cocoa mixture is melted and combined, cool slightly, then stir in the eggs, little by little, followed by the flour and coconut.
  3. Tip into the tin and bake for 45 mins on a middle shelf – check after 30 mins and cover with another piece of baking parchment if the crust is browning too much. Cool in the tin, then carefully lift out and cut into squares.
Yield: 16 squares

Stuffed Mushrooms

I love stuffed mushrooms and this time I decided to give it a try and make them at home. The recipe is inspired on what I usually get in restaurants.

Stuffed Mushrooms

Ingredients

  • 250 g fresh mushrooms (chestnut, portobello, or any other you like)
  • 2 slices of bread, crust removed
  • 2 cloves garlic
  • 1 handful parsley
  • 2 tbsp olive oil
  • 1/2 cup parmesan cheese, grated

Preparation

  1. Preheat the oven to 190C. Remove the stalks of the mushrooms and place them in a baking dish
  2. In a food processor, add the bread and blend it to get crumbs. Add the garlic, parsley, 1 tbsp of olive oil, and half of the cheese. Blend until well combined.
  3. Fill each mushroom with the mixture. Sprinkle the remaining cheese on top and drizzle with the remaining olive oil.
  4. Roast in the over for about 10 minutes or until the cheese has melted and is golden brown. Serve as appetizer or as a side dish.

Pear Cake

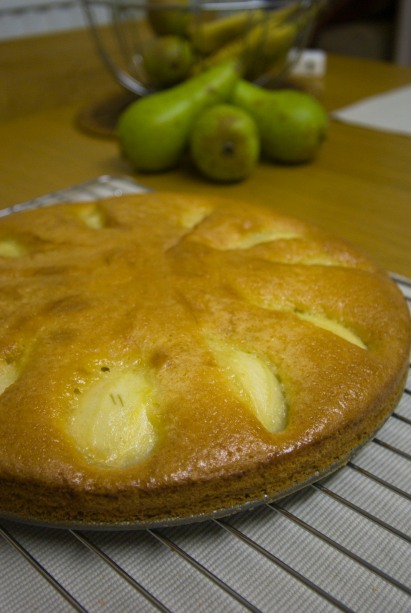
There are  so many pears in the tree in our garden at the moment that I needed to find a recipe to use them, besides eating pears every day. And what a nice surprise this cake was! I brought the whole cake to work and we had it with a cup of tea.

The sponge is very light and the pears make the cake very moist. It is not too sweet either. Just perfect!!! It could easily be served as dessert as well. Very easy to make and it can impress your guests. I can give you some pears if you want to try 🙂

Pear Cake

Adapted from here.

Ingredients

  • 75g butter, melted, plus extra for the tin
  • 3 ripe large pears, peeled, cored and cut in quarters
  • juice 1/2 lemon
  • 113g plain flour
  • 1 1/2 tsp baking powder
  • 1 pinch of salt
  • 113g caster sugar
  • 3 eggs, beaten
  • 2 tbsp demerara sugar
  • 2 tbsp apricot jam, for the glaze (optional)

Preparation

  1. Heat oven to 180C/160C fan. Line a 24cm loose-bottomed cake tin with baking parchment and brush with butter.
  2. Put the pears cutted in quarters in a bowl with the lemon juice to prevent them discolouring. Sieve the flour and baking powder into a bowl, adding a pinch of salt and the caster sugar. Next beat in the eggs and melted butter until smooth.
  3. Pour half of the cake mixture into the tin. Arrange the pears in a circle with the bigger part closer to the side of the tin. Pour the rest of the cake mixture without covering the pears. Sprinkle the demerara sugar on top.
  4. Bake in the preheart oven for about 40 mins or until a skewer comes out clean. Place on a wire rack and allow to cool slightly before removing from the tin, gently peeling away the parchment.
  5. To make the glaze, melt the apricot jam with 1 tbsp water and pass through a sieve to remove any lumps. Brush the cake with the glaze and serve.

Yields: 8 servings.

Apple Cake

To celebrate the apple season here and to use the apples we pick from our tree I baked this cake, which is very delicious. I have made this cake for some time already, but making it with our very own apples makes it taste even better. Hmmm… and the smell of apples and cinnamon in the house when the cake is in the oven it’s just so good!!!

Apple Cake

Cake

  • 3 apples
  • 3 eggs
  • ¾ cup oil
  • 2 tbsp ground cinnamon
  • 2 cups caster sugar
  • 1 tbsp baking powder
  • 2 cups plain flour
  • 100 g raisins
  • 50 g walnuts, roughly chopped

Orange Syrup (optional)

  • Juice of 2 oranges
  • 1 tsp ground cinnamon
  • sugar

Preparation

  1. Preheat oven to 180C.
  2. Wash and peel the apples. Reserve both the peels and the pulp separately. Chop the apples into small cubes.
  3. Place the peels in a blender. Add the eggs, oil, cinnamon, sugar and baking powder. Beat until you get a homogeneous mixture.
  4. Transfer to a bowl and add the sifted flour, chopped apples, raisins and walnuts. Stir until everything is well combined. Pour the batter into tin with a hole in the middle, greased and floured.
  5. Put in the preheated oven and bake for about an hour or until a toothpick inserted in the middle comes out clean.
  6. Syrup: Stir all ingredients until the sugar is dissolved and spread on top of the cake when still warm.
  7. If you prefer without the syrup, just sprinkle icing sugar using a sieve.
Yield: 12 servings

Peteleco Cake

Do you want a chocolate cake ready in no time? Then this is the recipe for you. I got it from Nestlé’s website, but I had to change the syrup that goes on top because the cocoa powder I had was only enough for the cake batter 😛 On the other hand, I had a chocolate bar, which was the perfect alternative for a topping. Here I’ll post both (topping and syrup) and you can pick one.

If you’re curious about the name of the cake, the word “peteleco” in Portuguese means a flick, a quick slap. So the name says it all about this cake 🙂

Peteleco Cake

Ingredients

Cake

  • 3 cups all purpose flour
  • 2 cups caster sugar
  • 1 cup cocoa powder
  • 1 tsp baking powder
  • 1 tsp bicarbonate of soda
  • 1 cup sunflower oil
  • 2 eggs, lightly beaten
  • 2 cups boiling water

Topping

  • 100g plain chocolate (74% cocoa)
  • 1 tsp butter
  • 2 tbsp caster sugar
  • 1 tbsp water

Chocolate Syrup (alternative for the topping above)

  • 6 tbsp caster sugar
  • 2 tbsp cocoa powder
  • 1 tsp orange zest
  • 1 tsp butter
  • 1/2 cup water

Preparation

  1. Preheat oven to 200ºC and grease a rectangular 22 x 33 cm tin with butter and sprinkle flour all over it.
  2. For the cake, sift together the flour, sugar, cocoa powder, baking powder and baking soda in a bowl.
  3. Add the oil, eggs and lastly the boiling water, mixing well.
  4. Pour the batter into the pan and bake for about 25 minutes.
  5. For the topping, melt the chocolate (double boiler or in the microwave). Transfer to a saucepan and add the butter, sugar and water. Heat over medium-low heat, stirring until the sugar melts, but do not boil. Spread over cake while still hot.
  6. If you choose to make the syrup, combine all ingredients and bring it to the boil until it becomes a thick syrup. Remove from heat and spread over the cake as soon as you take it out of the oven.